Redmond Hunt Blog
Top 6 Trail Camera Frustrations SOLVED (By Experts)
Got trail camera problems? We have solutions! Learn trail camera placement tips, the best batteries for trail cameras, how to get deer on trail cam, & more.
If you use a trail camera, you know how frustrating it is when things go awry in the field. Maybe you're getting no deer on camera, you’re getting way too many pics (without deer), or the battery keeps dying. Whatever the issue, it can leave you feeling like you're wasting time, money, and opportunities. But fear not! We can help get your trail camera skills dialed in.
In this blog we cover common trail cam problems and provide practical solutions to help you get the most from your device. Join our experts—Andrea Rothove with Browning Trail Cameras and Isaac Boone with Redmond—as they explore everything from trail camera placement to battery life and share tips on how to get more deer on camera. Let’s help you overcome your frustrations and own your trail cam site.
Quick Content Guide
- Tips to avoid false triggers and photos of nothing.
- Tips for better trail camera placement and pics.
- Best batteries for trail cams and how to extend battery life.
- FAQ’s about trail camera SD cards and problems.
- How to attract more deer to your trail camera.
- Leverage your site with a simple 3-step mineral program.
Problem #1: Why is My Trail Camera Taking So Many Pictures?
You sit down, ready to scroll through frame after frame of big bucks on your trail camera SD card, and instead? You’re sorting through endless photos of stray leaves and swaying limbs. It’s grit-your-teeth frustrating and leaves you wondering what went wrong—a camera malfunction, user error, or something else?
Trail Camera False Triggers
The short and most likely answer is false triggers. Trail cameras can be triggered by anything that moves—occasionally even things as simple as leaves and raindrops. Andrea with Browning Trail Cameras and Huntress View explains how trail cameras work and shares tips to avoid filling them up with photobombing vegetation.
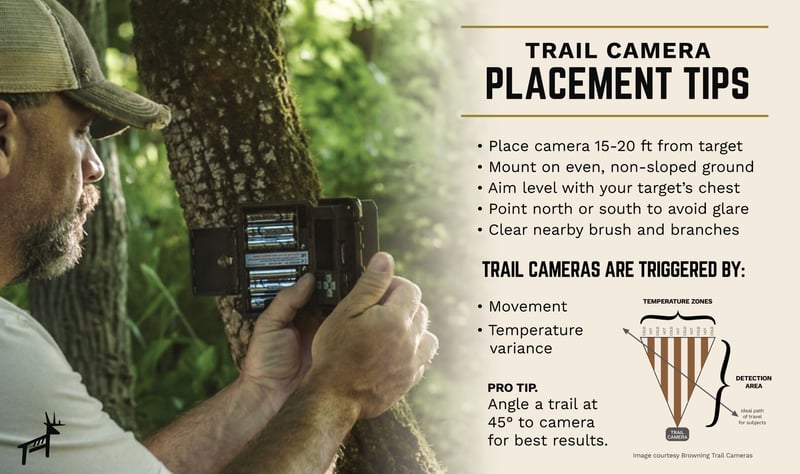
Andrea: “Trail cameras are triggered by (1) motion and (2) temperature variance. When a trail camera senses both, it takes an image or video. It does so by using a passive infrared (PIR) sensor. The sensor works best when a sizeable temperature difference exists between the animal and the outside temperature.
"Small leaves or twigs shouldn’t produce many false triggers. BUT… if a large branch moves due to wind, the camera may see both the movement and the temperature behind it, causing it to trigger.”
Tips to Eliminate False Triggers
- Point the camera facing north or south. Facing your camera east or west (toward the sun at sunrise and sunset) can cause it to detect fluctuating temperatures and take unwanted photos.
- Target the area you expect movement. Angling a trail at a 45° angle to your camera will keep an animal inside the detection zone longer and give your camera a better opportunity to capture it.
- Trim close or low-hanging vegetation. Use clippers or a weed eater to knock down grass, brush, and low-hanging limbs in front of and around your trail cam site.
Problem #2: Why Isn’t My Trail Camera Taking Good Pictures?
Instead of capturing tines, hooves, and everything in between on a big buck, you’ve got images of legs or antlers only. Or maybe you have a full-body photo of what looks like a trophy 10-point, but there’s too much sun flare to be certain. How do you take better images and get better intel?
Tips for Trail Camera Placement & Height
Andrea: “Issues with poor photos or angles are generally easy to fix. These trail camera placement tips will help you get better photos and videos:"
- Waist High. Mount the camera waist high, or level with your target species’ chest.
- Level Aim. Mount the camera on level ground—avoid uneven or sloped areas.
- Clear View. Clear brush, twigs, and branches that may hinder camera performance.
- Measure Distance. Place the camera 15-20 feet away from your target. (Some cameras have a large detection range. Check your trail cam manual for exact specs to set up the camera according to its capabilities and your needs.)
- Point North. Facing your trail camera directly east or west can produce images blown out by the sun at sunrise or sunset.
- Detection Zone. A trail camera detection zone is cone-shaped and extends out from the camera. It’s best to capture your target moving through the detection zone at an angle. It may not be seen if it is walking directly toward the camera, as it is likely staying in the same temperature zone.
Problem #3 Why Is My Trail Camera Not Taking Night Pictures?
Andrea: "One very common cause of trail cameras not taking nighttime images a battery issue. For example, Duracell recently made changes to their batteries that can cause trail cameras not to trigger or the flash not to go off at nighttime once the batteries begin to get low—say around 30% or so. The same can be true for rechargeable batteries. At Browning, we recommend Energizer Lithium and/or the Browning brand batteries. So, simply switching the type of battery you use can often resolve nighttime image issues."
Problem #4: Why is My Trail Camera Draining Batteries So Fast?
Ah, the anticipation of finally checking your trail cam after weeks of self-control…only to find the batteries died two days after your last visit. There's nothing more frustrating than wondering how many perfect shots of mature bucks you missed. Learn what affects battery life below and how to optimize it so your trail cam doesn’t give up when you need it most.
How Long Do Trail Camera Batteries Last?
Andrea: “Trail camera battery life can be difficult to estimate. Many variables play into how long batteries will last in trail cameras, including:
- Mode of operation. Are you using the timelapse feature, video mode, or burst mode? These functions sap batteries quickly.
- Number of images/videos taken. If you’ve got a busy site, your batteries won’t last as long—which is a good problem!
- Number of images/videos taken when flash is needed. More flash time = less battery life.
- A string of cold days. If temperatures consistently sit below 32F, expect battery life to decrease faster.
What Are the Best Batteries for Trail Cameras?
Andrea: “The best AA batteries for a trail camera are lithium. At Browning, we recommend Energizer Lithium or Browning brand batteries. They stand up to cold temperatures better than alkaline and use a longer delay between images, which helps extend battery life.
"As far as rechargeable batteries, they are not always preferred. Rechargeables won't operate the trail camera reliably or to its full potential, as they have less capacity and lower voltage. As always, however, refer to the instruction manual and use the batteries recommended for your trail camera to get the longest possible battery life.”
Problem #5: Trail Camera SD Card Problems & Storage
An SD card is a crucial component of trail cam setup. Without it, your camera can’t store the cache of pictures and videos it captures, and you wouldn't be able to view them. Andrea answers common questions about SD cards for trail cameras below.
What Size SD Card for a Trail Camera?
Andrea: “If you plan to use your trail camera mostly for videos or timelapse, that takes up more real estate on your SD card. Go with a larger-capacity card (most Browning cameras can handle SD cards up to 512 GB SDXC) for that type of surveillance. If still images are your main MO and you feel your card won't fill up before you can get back to the camera, a smaller-sized card (8 to 32 GB) should be enough.”
What is the Best SD Card for a Trail Camera?
Andrea: “For best results, always refer to your trail camera’s instruction manual and use the recommended SD card brand and size for that specific model. Browning recommends Browning brand, SanDisk, or Kingston SD cards with a class-10 rating for optimal performance.”
How to Format an SD Card for a Trail Camera?
Andrea: “Formatting your SD card is important—don’t skip this step! If the card has been used previously in other devices or cameras, traces of those devices’ formatting may be left, which can cause issues. Format the card each time you install it to ensure proper communication with your trail camera.
“On a Browning camera, format the card by inserting the SD card and performing the "Delete All" function in the camera's setup menu. Occasionally, an older SD card that’s been used for a long time or in multiple different devices may need to be reformatted via a computer.”
Problem #6: Why am I NOT Getting Deer on Trail Cam?
Let’s say you’ve had your gear set up for several weeks and still have no deer on your trail cam. Or you’ve previously had an active site but suddenly the deer stopped showing up on camera. Our Redmond whitetail expert, Isaac Boone, covers possible reasons for the no-show and solutions to start snapping good pics of big bucks on your trail camera.
Trail Camera Placement Problems
Isaac: “If you’re seeing little or no deer movement at your site, it may be the physical location of your trail camera. Maybe deer don’t move much in that area or don’t feel comfortable. The trail camera placement tips below can encourage more traffic."
Best Place to Put a Trail Camera for Deer
- Areas with easy access you can drive to or require only a short walk.
- Near but not in a bedding area.
- High-travel zones—like a trail leading from a bedding area to a food source.
- On the edge of food plots.
Seasons and Food Sources Have Changed
Isaac: “Food supply changes and the seasons are a big factor on camera traffic. If no deer are showing up, it may be the wrong time of year for where the camera is placed.
"Remember, if the food goes… so do the deer. Food crops are usually great locations during summer. But as the weather cools, crops are cut, and bucks go hard horn, deer start moving. Then an area with no movement in summer may become a great spot post-rut.
"So sometimes the season just isn’t right, and you need to lay back, be patient, and stay out of the area. When deer do come back, you’ll be in business.”
Human Pressure/How Often You’re Checking Trail Cameras
Too much human pressure may also cause deer to move out. With a big mature buck, one mistake and he may never show up again—or he’ll go nocturnal and you’ll struggle to get him back into daylight. Checking your camera too much and leaving scent are two big mistakes that run deer out. Find tips to avoid both below.
How Often to Check Trail Cameras
Isaac: “Generally, you should check trail cameras no more than every ten to 14 days to reduce human pressure on deer. If it’s during the rut and deer are moving a lot, you may need to go in every seven. If it’s pre-season, you might not check it for three months.”
Follow these tips to avoid blowing out deer when checking trail cams:
- Spray boots and gear with a scent eliminator to minimize scent.
- Drive as close as possible and keep the remaining walk to your site short.
- Go in at midday when deer are likely to be bedded down.
- Check the wind before going in; if it’s blowing into bedding areas, stay out.
- Enter away from bedding areas.
- Go in stealth and keep the noise down.
Not Enough Trail Cameras
Sometimes you need to increase your assets to capture more intel. Adding another camera or two on your property can help you pattern deer and see how and where they’re moving. Which leads to the next question… how many trail cameras should you use?
How Many Trail Cameras Do I Need Per Acre?
Isaac: “I recommend setting up two trail cameras per 80 acres—occasionally more if you’re tracking an elusive buck. Last year I had six cameras out on about 260 acres at fence crossings, food sources, field edges, and high-movement areas where I could get in and grab them quickly without pressuring deer.”
Not Using a Deer Attractant
Still struggling to bring in deer to your site? It's time to bring in the big guns—deer attractants! Isaac gives the lowdown on how to attract deer and transform your trail cam game.
Isaac: “If you really want to get more deer on camera, bring in a mineral attractant. You’ll not only double or triple your photo quantity, but with the right scent, you can pull deer from hundreds of yards away. Expect your camera to blow up for two or three days after adding a good deer attractant before slowly decreasing. Refresh sources every 10-14 days to keep deer coming in consistently.”
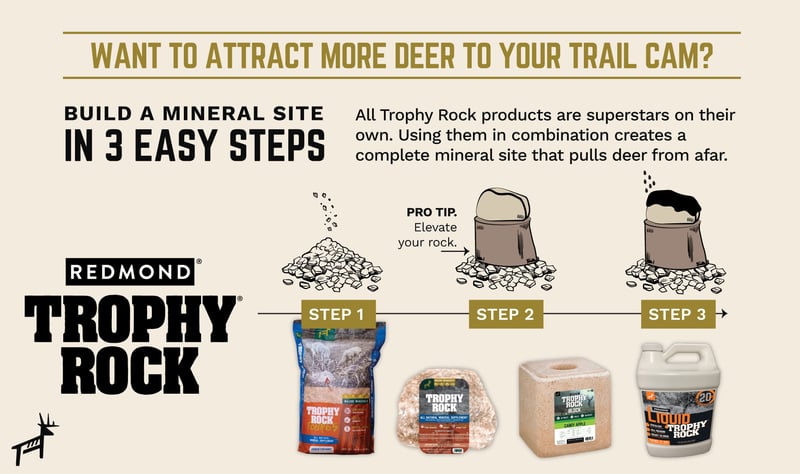
How to Attract Deer to Trail Cameras using Trophy Rock Minerals
Redmond can help pull you from your crappy trail camera experience and leverage your device with an easy three-step program. Here’s how to build an effective deer mineral site and get more big bucks on your trail camera:
- Clear an area on the ground and pour out Four65 granular minerals.
- Elevate a Trophy Rock/Block on a stump, stand, or larger rock above.
- Top off your Rock/Block with Liquid Trophy Rock to activate the site.
Now, roll your trail cam and let the action begin! By understanding trail camera placement, investing in good batteries and SD cards, and understanding how to attract deer to your trail camera, you can mitigate many common frustrations. Now get out to your site and turn your trail camera woes into wins!

About the Authors
 Andrea Rothove is an avid outdoor enthusiast and hunting instructor. She is the founder of Huntress View—a hunting website and blog helping women learn about hunting and the outdoors from other women—and an associate of Browning Trail Cameras.
 Isaac Boone has been hunting since he was old enough to walk. In 2003, he bought his first bow and shifted his hunting focus completely to whitetails and learning everything about those amazing animals. Isaac is also an in-field product specialist for Redmond.
© Redmond 2023. All rights reserved.